Skip to Main Content

West Warwick High School Library: Noodletools

Databases and Pathfinders

Noodletools


Use Noodletools to keep track of all of your research in one place: sources, note, outlines and final paper!

WWHS uses Google Apps for Education (GAFE) to access Noodletools.

How to Create and Edit a Source Citation

Step 1:

Navigate to the Sources screen. You can access it via two ways: 1) on the Projects screen, click the project's "Sources" icon in the "Contents" column,


or 2) open your project by clicking on its title, which defaults to the Sources screen.


Step 2: 

    Click the green New Source button in the upper-right corner.


Step 3: 

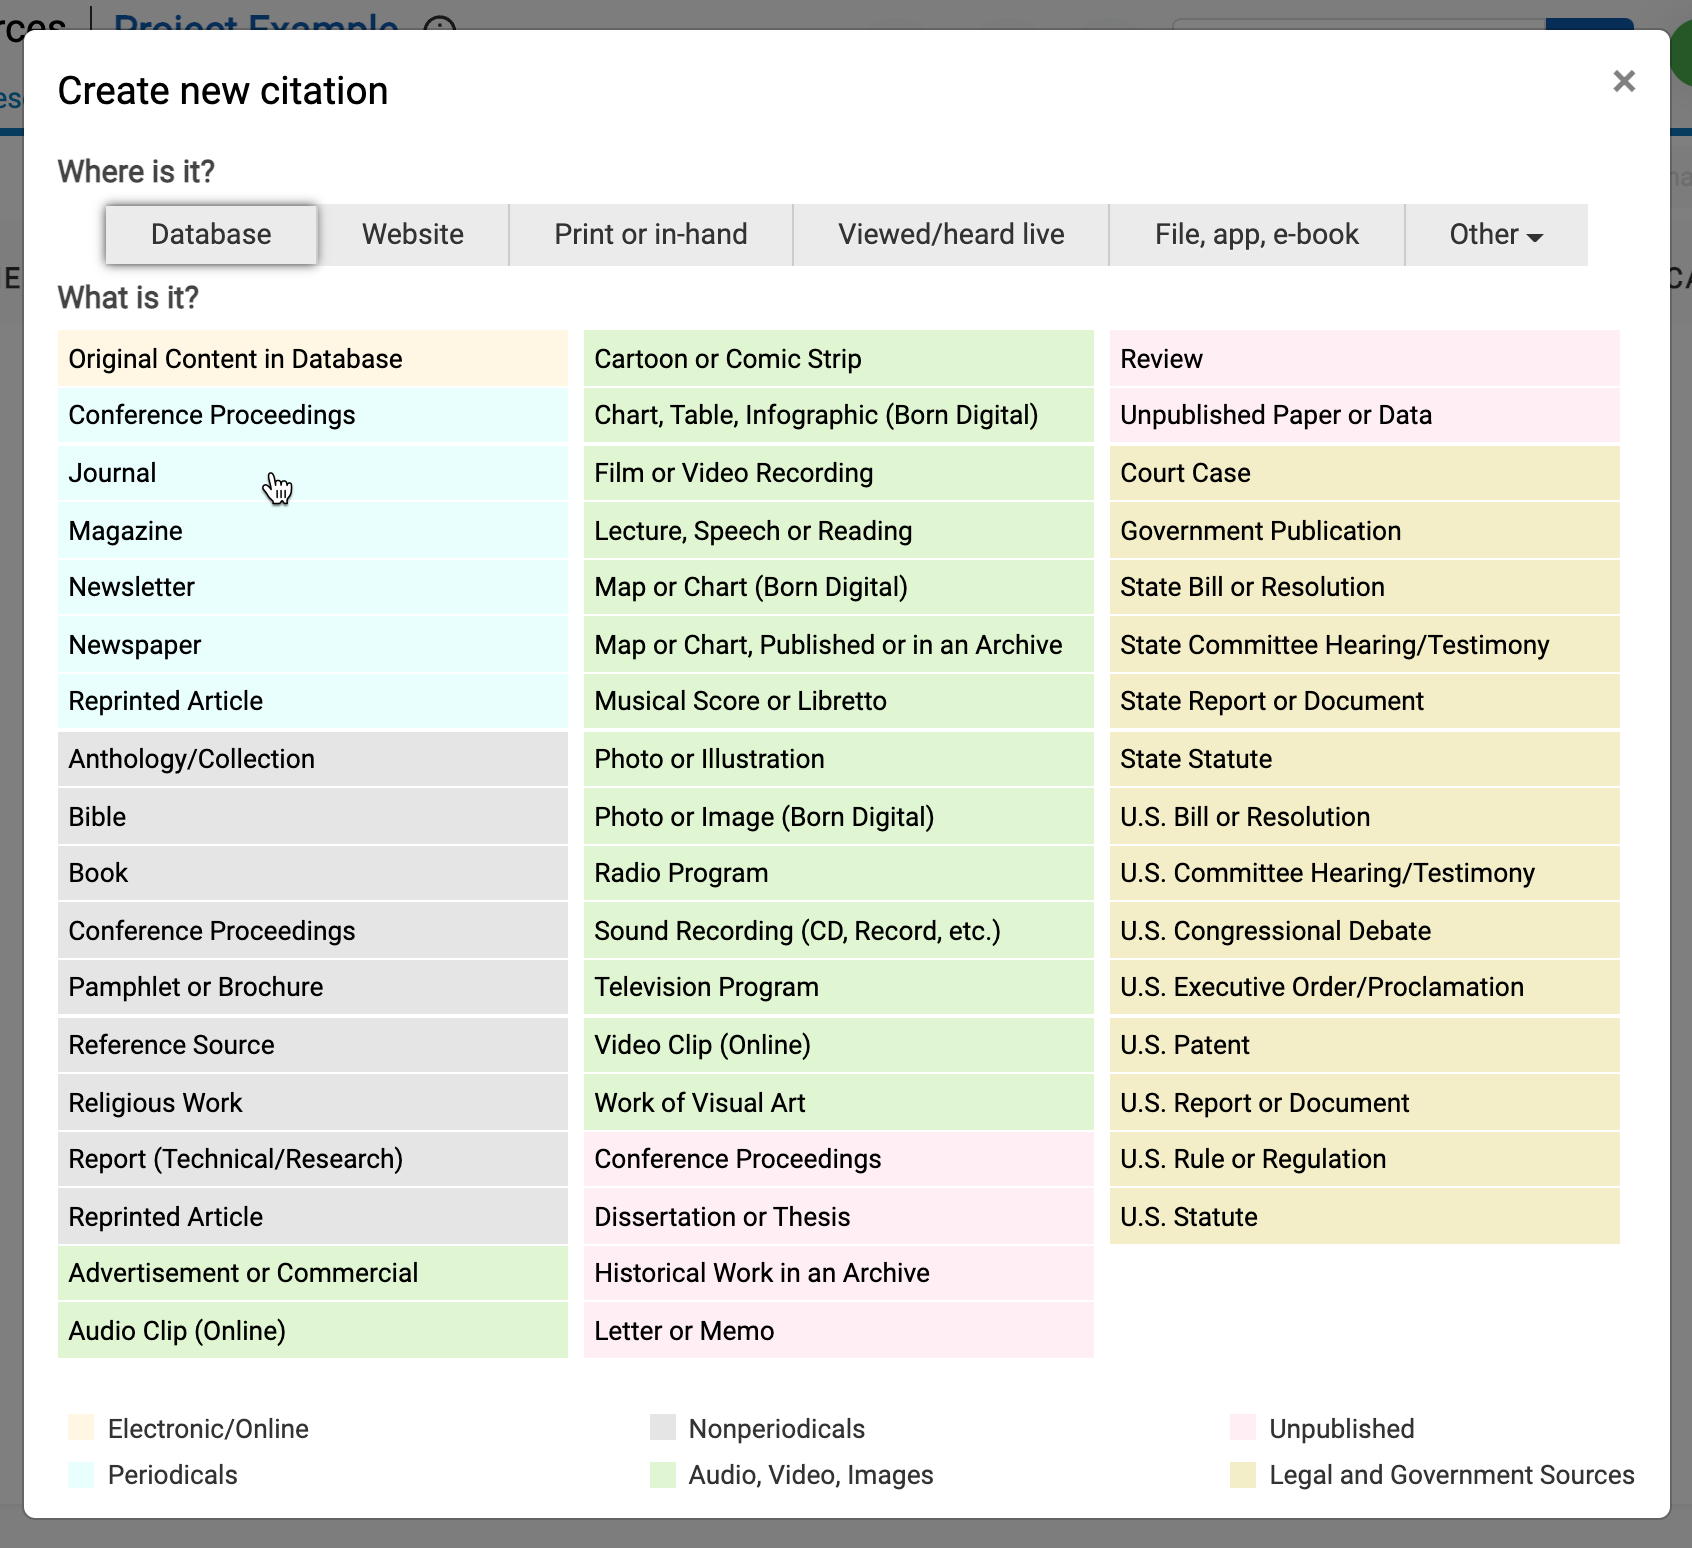
You will be prompted to select where the source is (in print, on the web, in a database, etc.) and then what it is (a book, a blog post, a journal, a TV program, etc.). The choices will vary depending on what project level you selected. 


Step 4: 

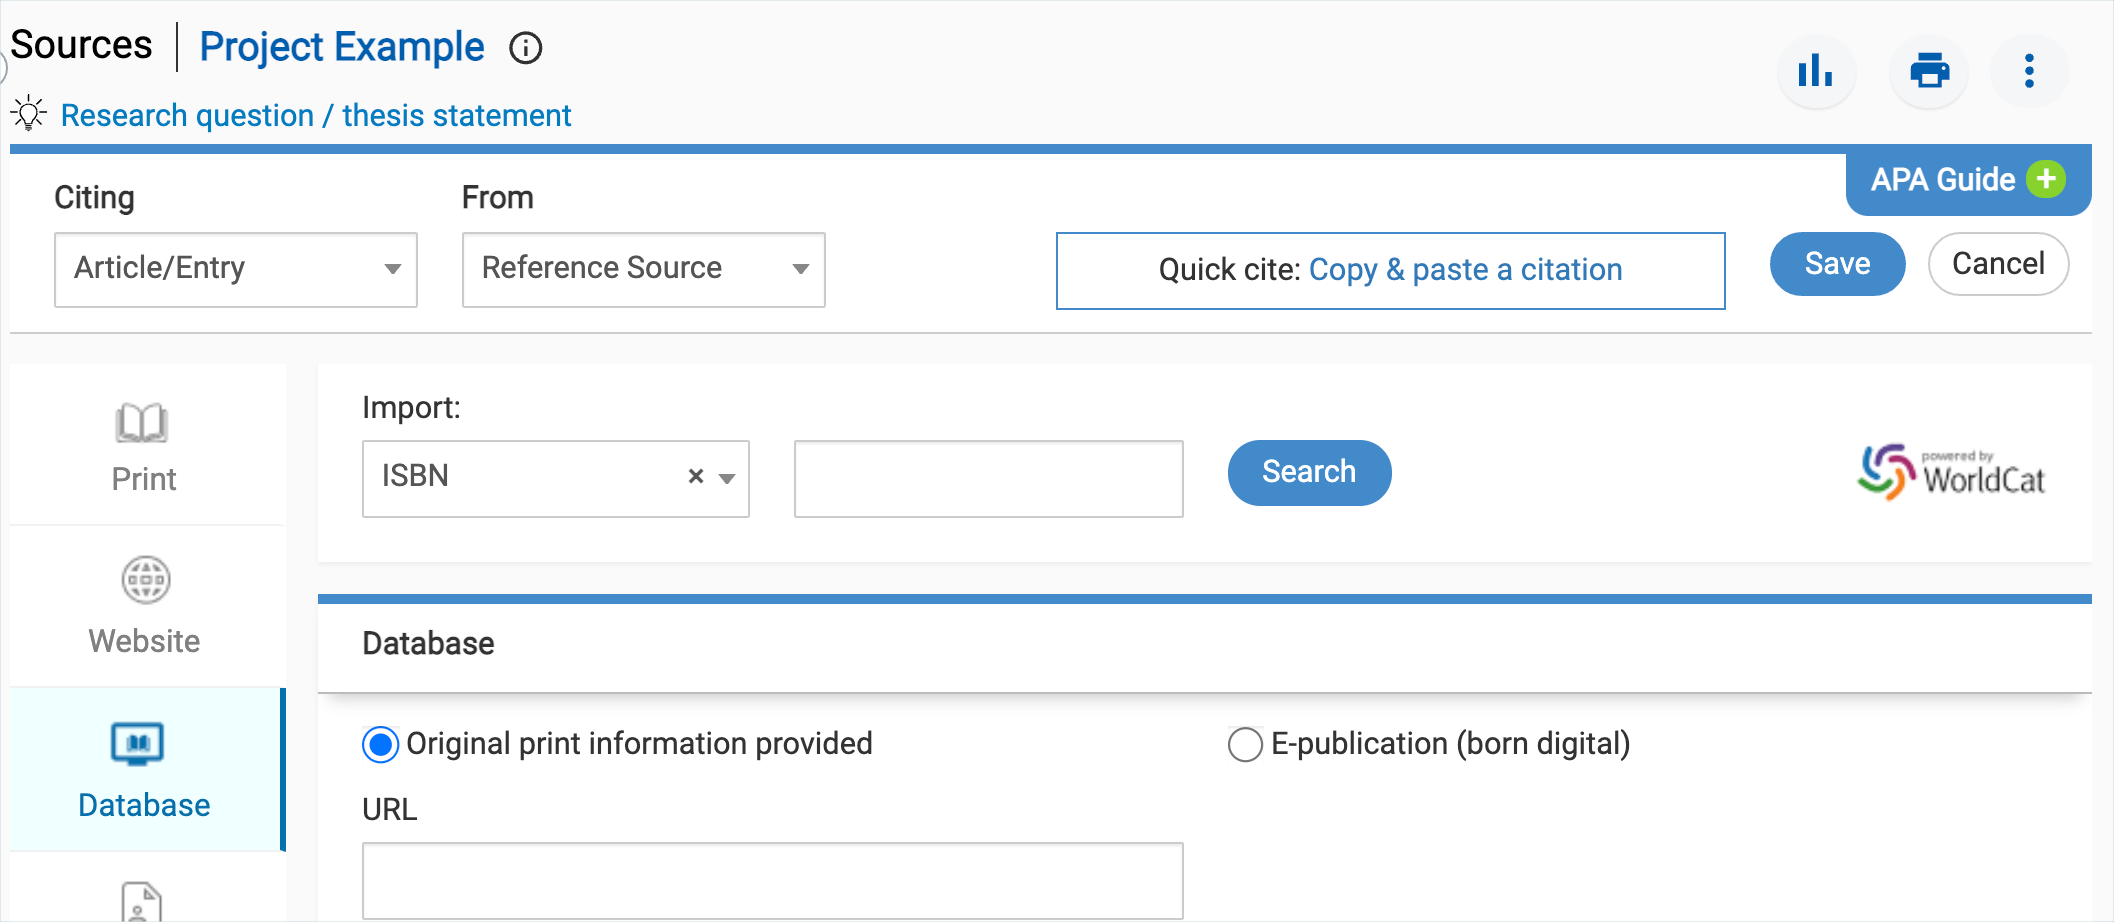
Once you select a source type, the citation form appears. 


Note: The fields change based on your project's style (MLA, APA, or Chicago) and level (Starter, Junior, or Advanced), as well as based on the source type and publication medium selected.

Step 5: 

On the form, fill in as many details about your source as possible. Help text is often available when you put your cursor inside a field. Click on the blue information ("i") icon to view the tip. 


Hint #2: Complete all fields for which you have information. If something isn't provided by the source (i.e. author, a publication date, etc.), it is okay to leave the field blank (do not type something like "none" or "N/A" into a field). 

Hint #3: As you type into a field, NoodleTools automatically checks for common errors with capitalization, abbreviations, and more. When a yellow warning popup appears above the field, read the suggestions on how to correct the potential problem. 

Step 6: 

Click Save to generate the source citation. 

Step 7: 

To edit a source citation, click the "More" (three dots) menu next to the entry and select "Edit." Modify the information about your source. You can:

Click Save.


Noodletools Guides

When you create a notecard, you (a) save the author's original words, phrases or images from a source you intend to use in your research and (b) think about how to express those ideas and expand on them in your own words. Create one notecard for one idea or fact, and link each notecard to a source citation.

Instructions

Step 1:

Navigate to either the Sources screen or the Notecards Tabletop View screen.

  • Adding multiple notecards for a particular source? Use Sources.
  • Already organizing notecards into groups and piles? Use Notecard Tabletop View.

Note: You can open the Notecards Tabletop View directly from the Projects screen by clicking the orange "Notecards" icon (in the "Contents" column).

Step 2:

Click the green New Notecard button if you are on the Notecard Tabletop View. 

Or, if you are on the Sources screen, click the "New" link next to your citation in the "Notecards" column.

Step 3:

Enter information where applicable: 

Title (required)

A few words describing the notecard's main idea. 

URL

The URL in your citation might not be a direct link to the content. You can add a different URL here if it helps you get directly back to the source.

Source (usually required)

If you created your notecard from the Sources screen, this field is auto-filled. If you created your notecard from the Notecards screen, be sure to select the source citation here.
Page If there are page numbers associated with the material you are entering in the "Direct quotation" field, enter them here (you'll need them for in-text citations or footnotes).

Tags

Add short (1-2 word) tags to help you identify and label concepts within each notecard. Type a comma between tags (for example, typing frogs, climate change will add tags "frogs" and "climate change").

Direct quotation

What should I enter in the "Direct Quotation" field on a notecard?

Paraphrase or summary

What should I enter in the "Paraphrase/Summary" field on a notecard?

TIP:    Explain how the evidence or data relates to the main point.

My ideas

What should I enter in the "My Ideas" field on a notecard?

Step 4:

Click the Save and Close button when you are done.

Important note: Notecards are auto-saved as you type. Clicking Save and Close at the end saves a final time, but you can use the Manage Versions option to retrieve past saves, if your work is interrupted or your computer crashes.

Your teacher may ask you to share your project. This gives your teacher the ability to look at your work and send you helpful feedback. Your teacher will give you the inbox’s name to type in when sharing your project. 

Instructions


Step 1:

On the Projects screenClick the "Add" (plus sign) icon in the "Sharing" column for the project.


Step 2:

In the panel that opens, click the Share button under "Share with an inbox."


Step 3:

Enter the inbox's name that your teacher provided to you. The inbox name will auto-complete as you begin to type so that you can select it from the list. Fill in your name if necessary, to allow your teacher to identify who you are (the field may be auto-filled from your user profile). 


Step 4:

Click Done. The panel updates with information about your shared project. Close the panel. An inbox icon appears in the "Sharing" column for the project. To edit the information, click on the inbox icon. 


How to export and print source citations 


Overview: When your list of citations is complete, export the list in order to print it with the formatting matching the requirements of the citation style you are using (margins, title, header, etc.).

Instructions

Step 1:

Navigate to your project's Sources screen.

Step 2:

Click the blue Export/Print icon button at the top of the screen.


Step 3:

Select a file format option from the menu:

Print/Export to Word

Creates a Word (.docx) document that you can download and open in Word Online, Microsoft Word or Apple Pages.

Print/Export as RTF

Creates an RTF file, which can also be opened in most word processing programs. 
Print/Export to Google Docs Creates a Google Doc in your Google Drive. You may be prompted to select your Google account. 

Preview as Web Page (HTML)

Opens your source list as a web page.
Formatting Options Options to change the formatting of your sources list before exporting. See step 4 below.

Important note: If selecting an option above does not generate the file, be sure that your browser does not have a pop-up blocker enabled that would prevent a new window from opening. 

Step 4:

If you select "Formatting Options..." a panel opens. Click the formatting option you want and read the instructions on the panel to make adjustments. 

Step 5:

To add the source list to your research paper, copy and paste the source list to the end of your research paper. It is customary to begin your source list on a new page, not on the last page of your research paper.

Step 6:

To print the source list, after the source list is exported in your word processor, print it using the program's "Print" command. Do not print the list in the "Preview as Web Page (HTML)" version because the web page uses only a close approximation of the correct spacing and formatting. 

Hint 1: 

If NoodleTools alerts you that your Google account does not match the information in your profile, go to "My User Profile" at bottom left (circle icon with your initials), and check that your Google account ID matches the account that is listed in the profile.

Hint 2:

If your computer is configured to open Word or another word processing program automatically, your source list may immediately download and open within that word processor. This may or may not be the word processor you are using to write the rest of your research paper. To save the source list, use that word processor’s "Save as..." to save the document in a format you want (e.g., in Word, as a .docx file) and to a location on your computer or network that you will remember.

Hint 3:

If your browser is configured to prompt you before opening the file, a browser pop-up window will appear asking you whether you would like to save or open the file. Click "Save" to put the file in a location on your computer or network that you will remember.

Hint 4:

A security message may notify you that the browser has blocked the site from downloading the file. Click the message to allow the download and follow hints 2 and 3 above.

Hint 5:

Do not re-save an .rtf file as an .rtf file after opening it in Word. Doing so will cause formatting issues due to the way Word handles RTF codes. Instead, save it as .docx. 


Creating a New Project

Create a Notecard

How To Fill in a Notecard

Noodletools Quick Guide for Students

This quick guide covers the following topics: 

  1. How to create a new account
  2. How to start a new project and a source list
  3. How to create notecards
  4. How to share a project with your teacher
  5. How to set up a project collaboration with your classmates


Click on this Quick Guide link.


NoodleTools Quick Guide for Students

Noodletools Quick Guide for Teachers

This quick guide covers the following topics:

  1. How to create a new account
  2. How to create a new project and add sources and notecards
  3. How to set up a project inbox to receive student work and provide feedback


Click on the Quick Guide link.


NoodleTools Quick Guide for Teachers